Anatomy of the Job Page - Part 2 (Tasks)
Describes the tasks, products and Job Preview areas of the Job Page
3. The Tasks section.
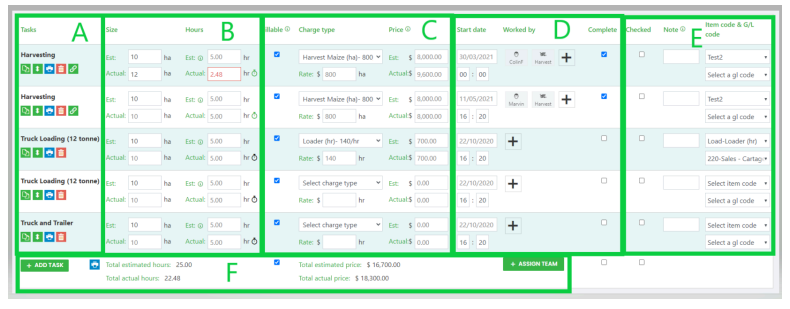
A: Task Name. The name of the task as set up in the job template - this will appear to the operator on his/her task list. Task option icons under the name allow you to:
- Duplicate the task, with all selections/entries and assignments.
- Drag the task to reorder it in the list. The order that the tasks show here is the order in which they will appear on the invoice.
- Print out a job card for drivers who do not use the mobile.
- Delete the task.
- Chain icon. This brings up the task detail page, showing details for the data collected on the mobile for that task. For most tasks, this will only show once the task has been completed, but for Spraying, Spreading, and Planting tasks, you can click through to add spray/products to spread instructions for the operator.
B: Task Size. All tasks will have a task time and task size. The units for the task size depends on the charge-out rate, or if the charge-out rate is hrs then the task size unit will be the same as the job size unit.
The estimated size for tasks is automatically populated from the job size, and the task size estimate is calculated from the task size * the work rate from the job template.
The actuals are automatically populated form the mobile, or can be manually entered. If there is no value entered then the estimated value will flow through automatically.
If there have been any entries made on the mobile for the task, then the stopwatch icon by the task time will turn from black to green. Clicking on it will bring up the Activity log from the operatorʼs mobile.
C: Charging information. The charging rates rates that can be selected are set up in Settings>Charge-out rates, and linked to the task on the job template. A rate can be set on the template to load by default. If the rate is manual overwritten then it must be removed before another rate can be selected.
The total estimated and actual amounts can also be manually entered.
D: Task assignment details. The task due date/time will default from the job due date. Resources can be assigned and updated here by clicking on the +. Once the operator has completed a task, or an actual task size/time is manually entered, then the 'Complete' task will be automatically set.
E: Miscellaneous.
The 'Checked' box can be manually ticked; this helps to keep track of what has been checked.
A task note entered here will appear on the mobile on the notes page, for this task only - not the whole job.
Item & GL code - should be automatically populated by the charge-out rate selected, but can be manually overwritten here if there is a problem blocking invoicing. Note that if there is a problem, then the charge-out rate may need to be updated.
Assigning teams: If you have team/job assignments set up in the teams area, then the
'Assign team' button lets you select a team to add the resources for.